Create reports using JavaScript Remoting and DataTables in Salesforce
Learn how to create custom reports with ease and view the data with a friendly user interface
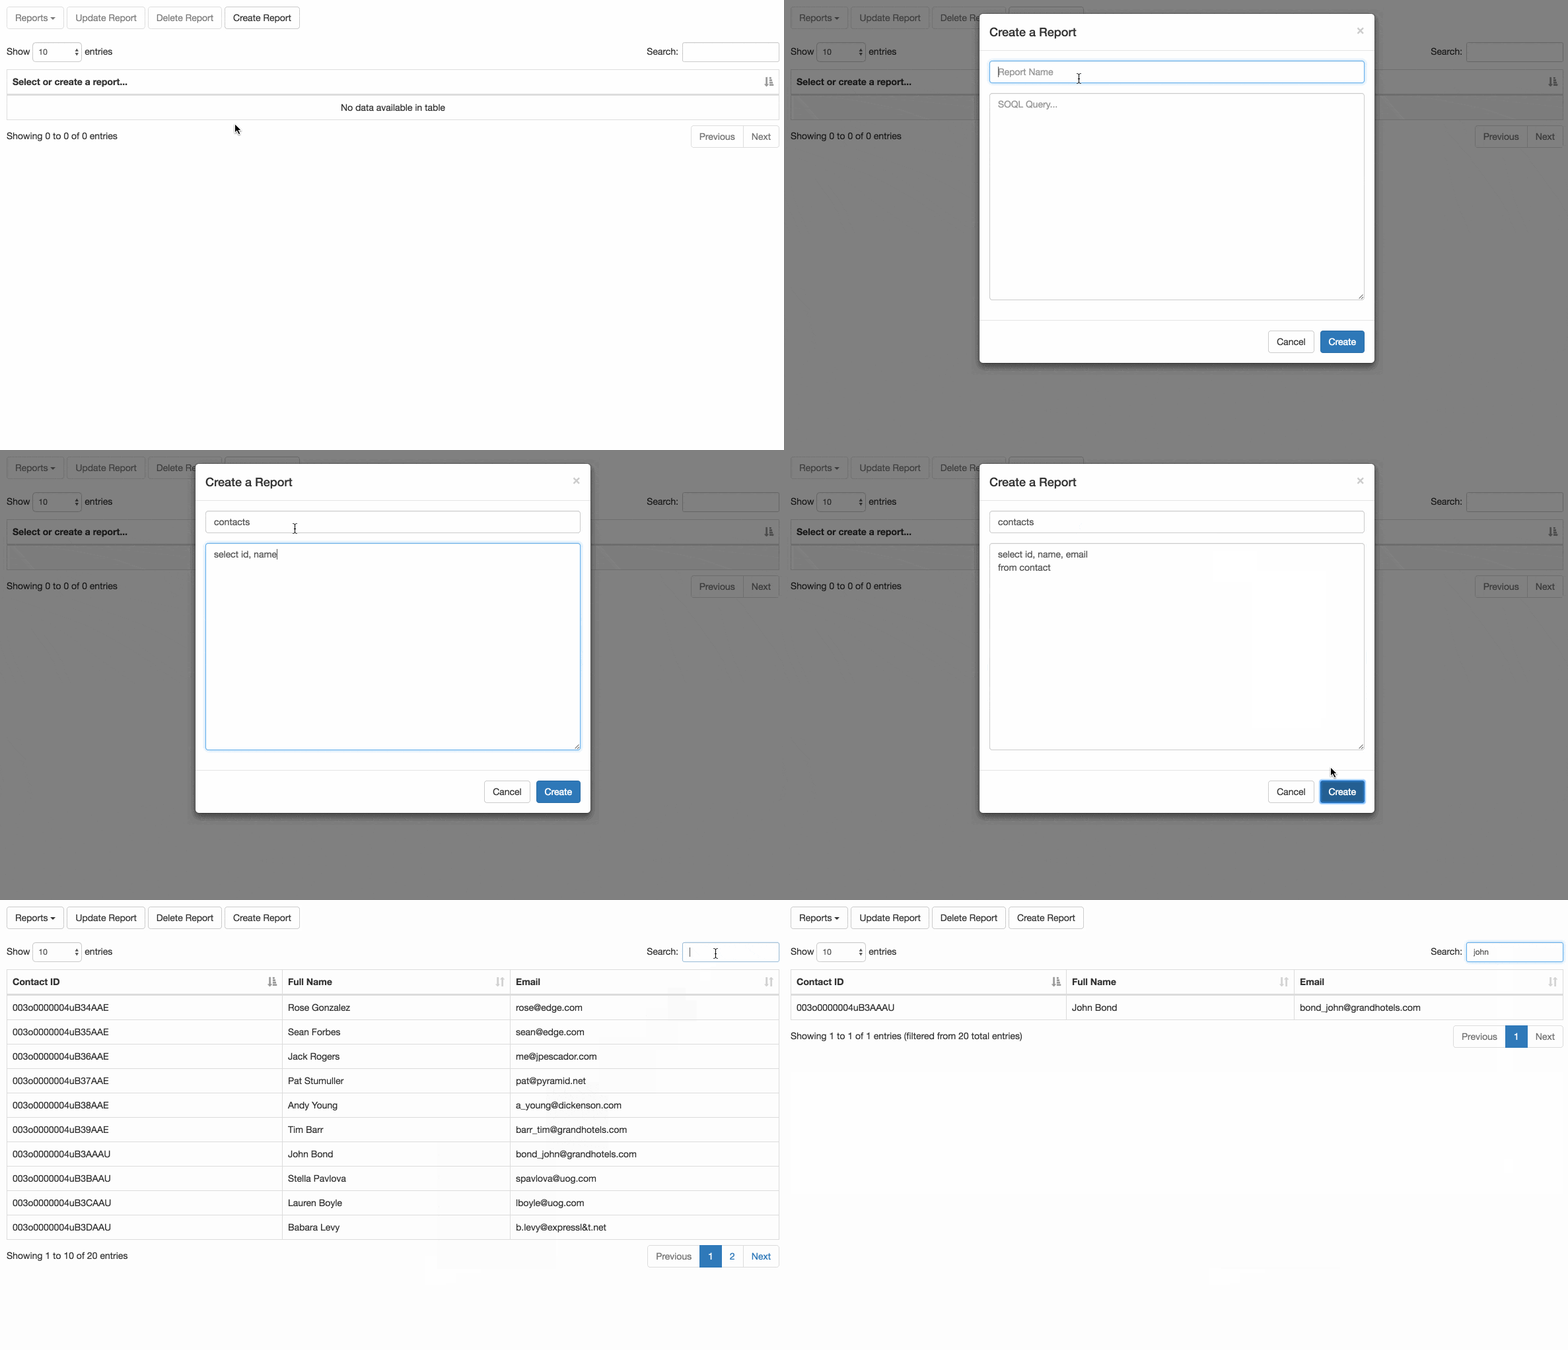
I’ve recently been using DataTables at work for a project which has been useful for all the features it provides such as pagination, instant search, multi column ordering, toggle column visibility, and fixed columns. In fact, I thought to myself why not try to utilize DataTables with standard Salesforce reports . Unfortunately, there are limitations to this approach. The first thing that comes to mind is that the “Reports API only returns up to the first 2,000 report rows.” Alas, the suggestion is to “narrow results using filters” for now. Second, I mentioned that DataTables can toggle column visibility. With this feature, we can download the report content as a CSV file and retrieve only the columns we want. However, with the Reports API it will retrieve all columns from the report even if we may have hidden some columns we do not want to see. With that said, I’ll be covering how to create custom reports using only one Apex class, one Visualforce page, and one Custom Object without the need of duplicating Apex code to create new reports. In fact, here’s a quick preview of what the final result will be.

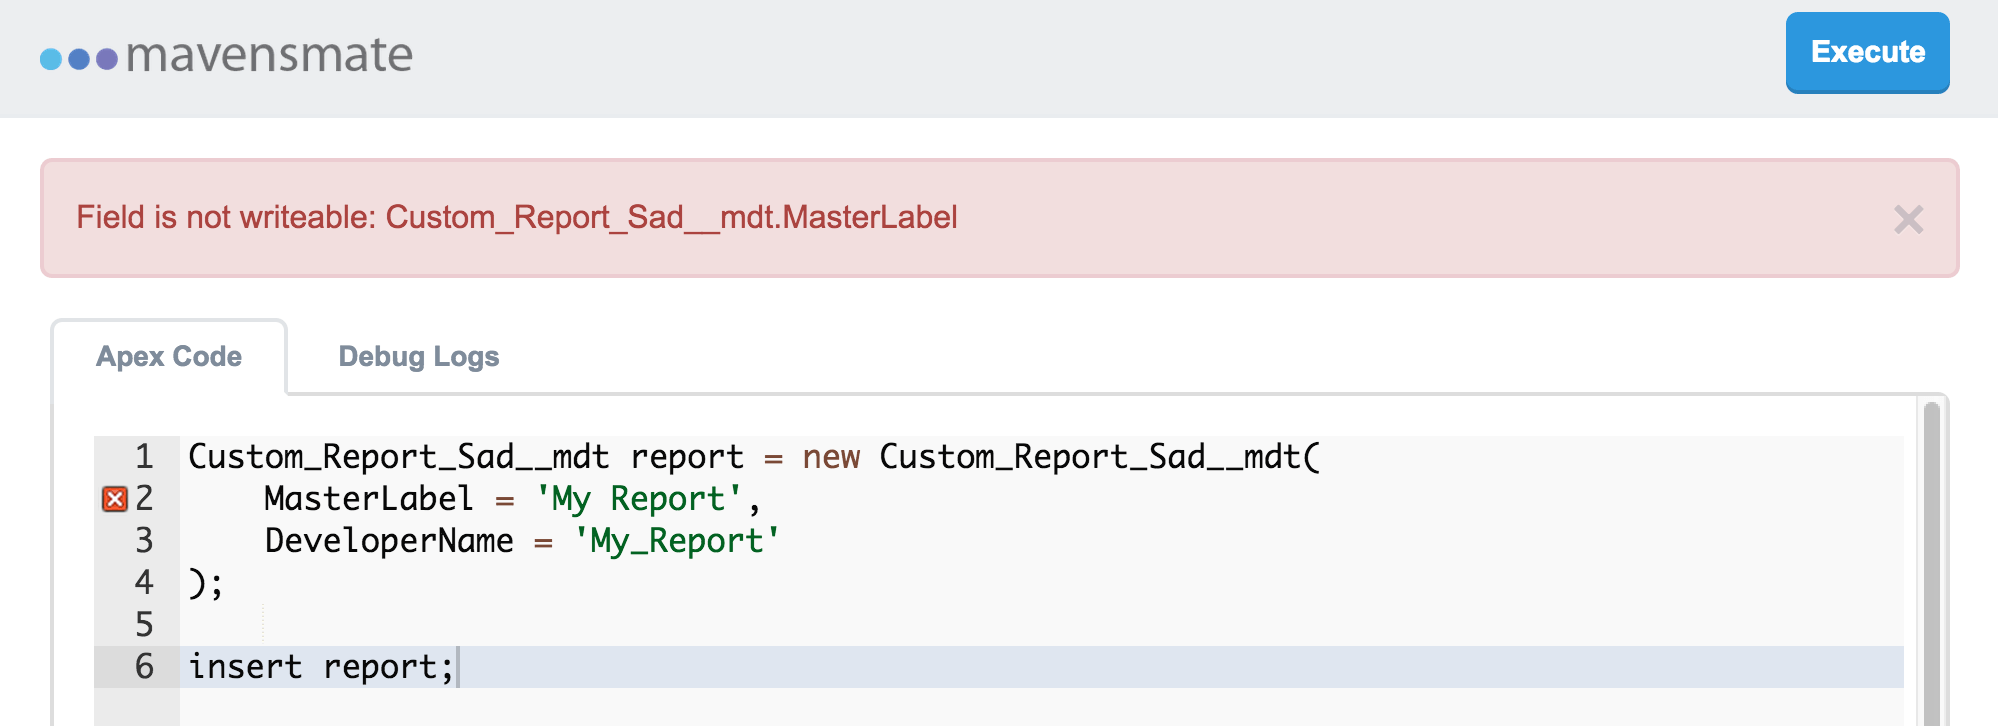
The Apex class will contain our JavaScript Remoting methods. These methods will consist of DML actions such as querying the list of available reports, creating a new report, and querying, updating, or deleting a selected report. The Visualforce page will contain our Ajax calls to the Apex class methods which we then use to update the view state without needing to refresh the page. Finally, our custom object will contain information about the report which will consist of the report name and SOQL query. Now, you may be wondering why use a custom object? Perhaps it would be ideal to use Custom Metadata Types . In fact, that was my first choice but unfortunately the fields are not writable in Apex…for now. The not writable error is shown below. Now let’s go over the structure of our custom object.

The Custom Object
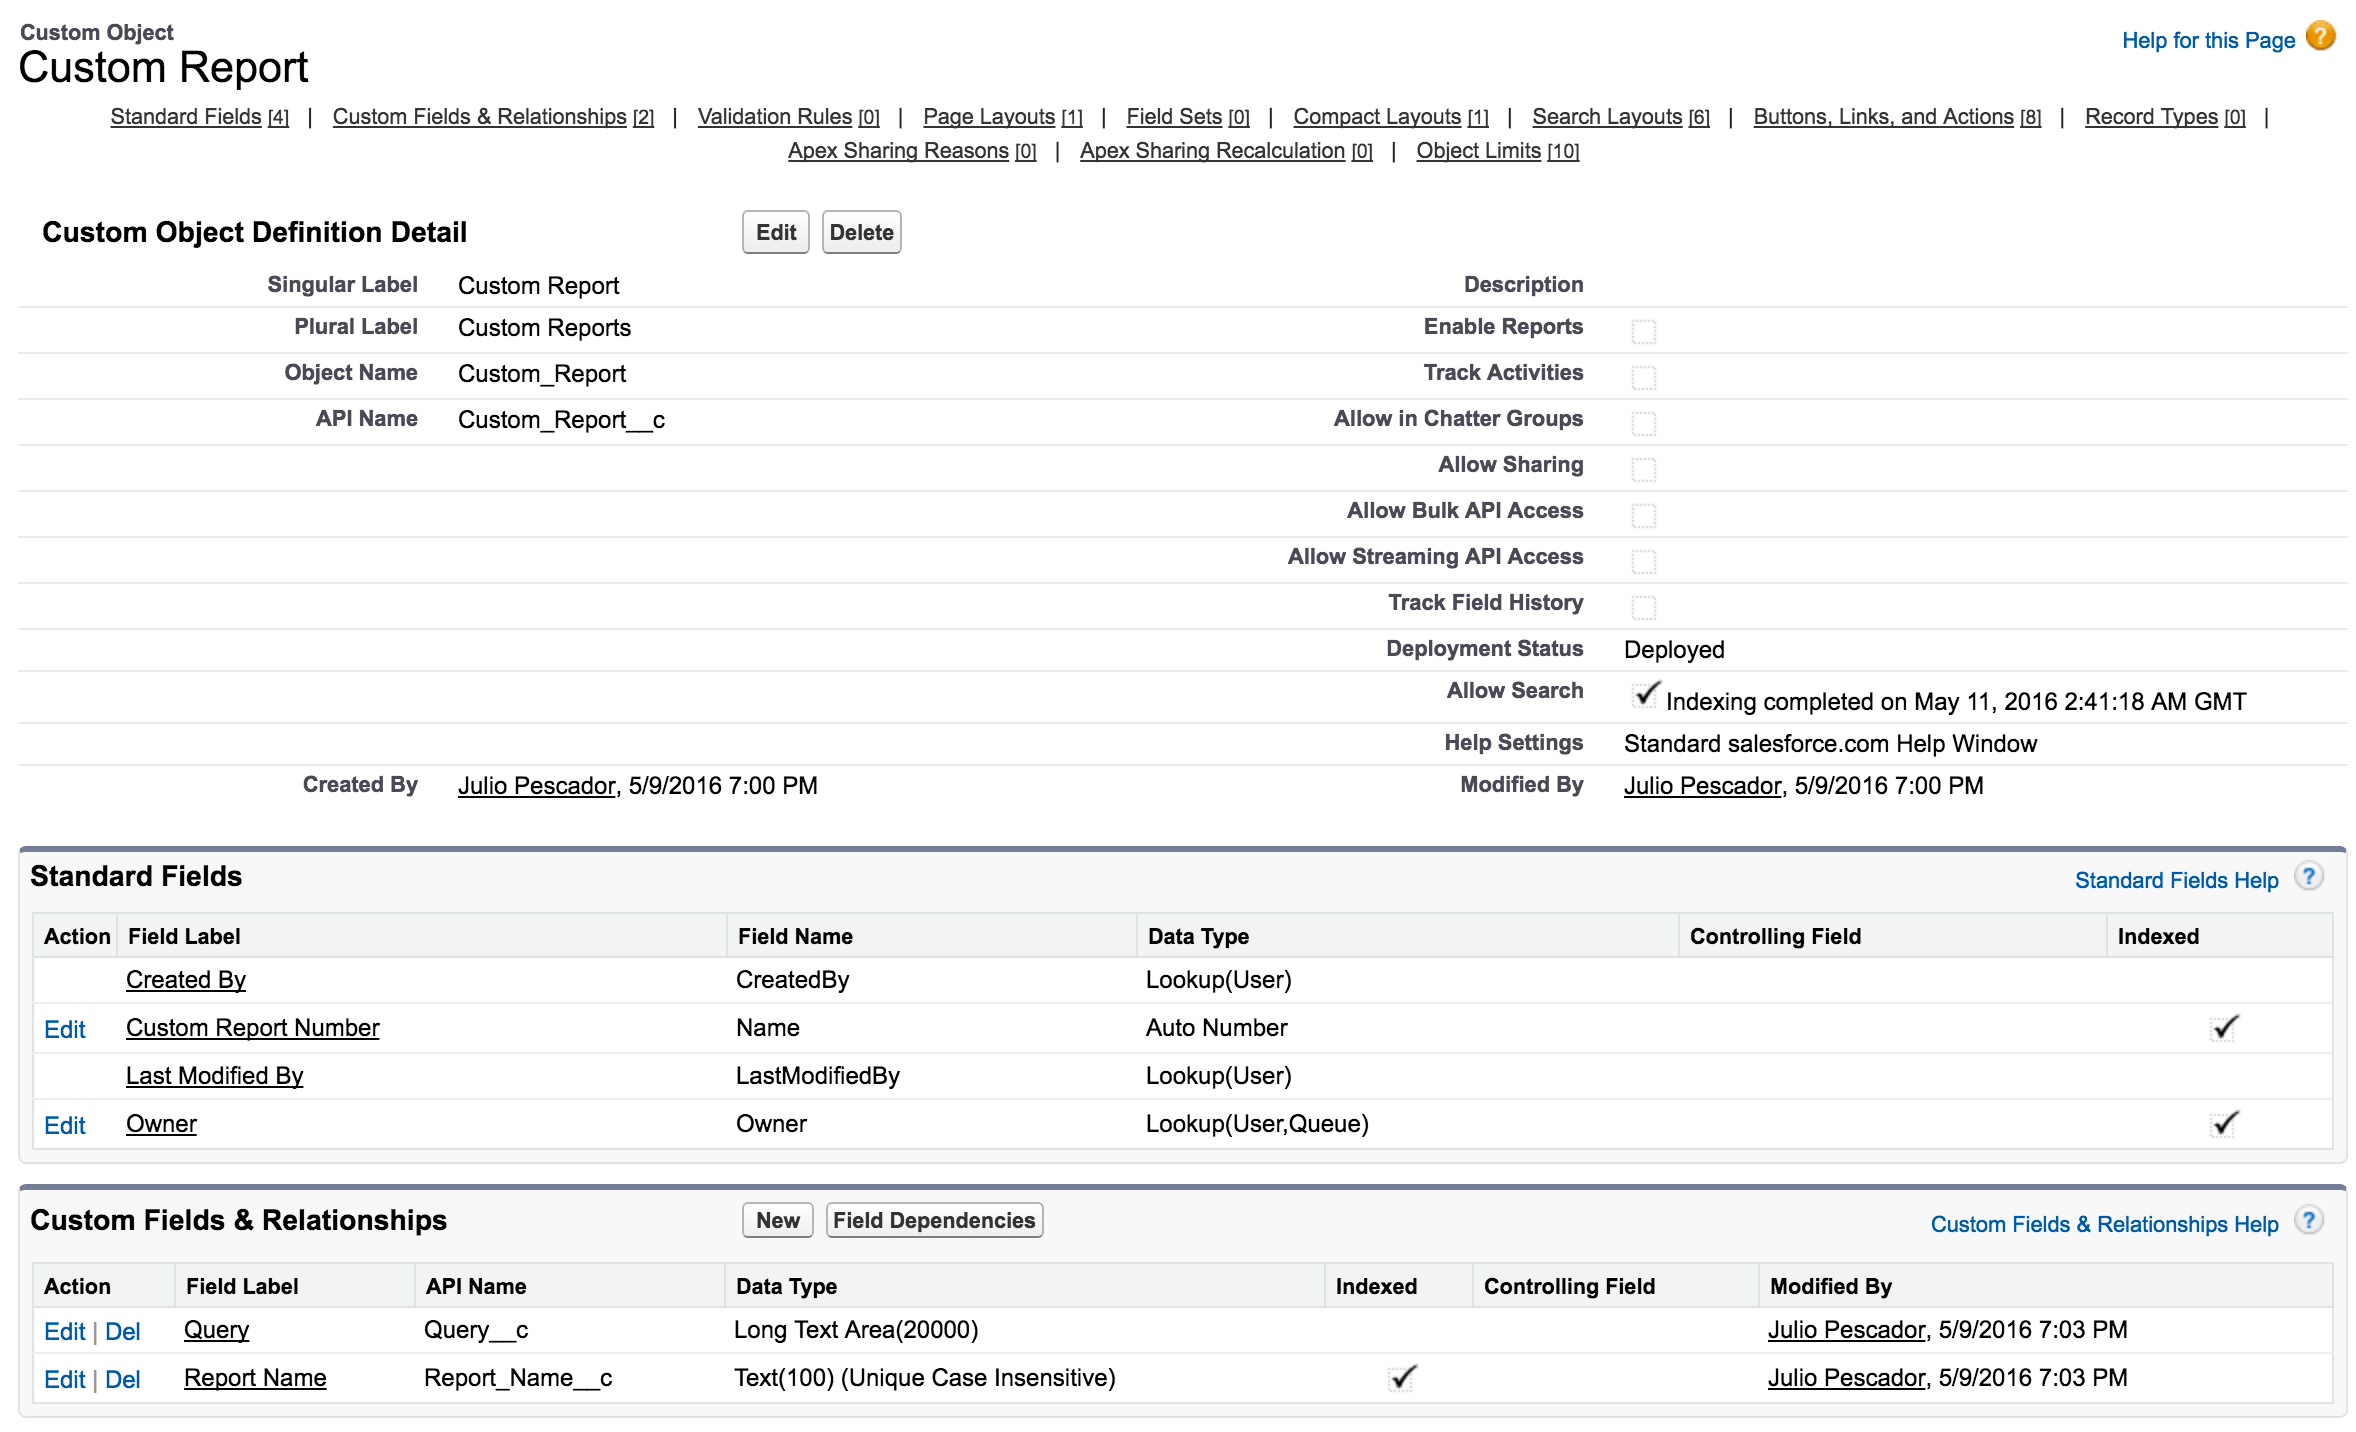
The custom object called Custom Report will consist of our standard fields and only two custom fields. The two fields will be called Report Name and Query while the API name will be called Report_Name__c and Query__c. The Report Name field will be a required text data type with a limit of 100 characters and unique case insensitive to prevent duplicate named reports. The Query field will be a long text area data type with a limit of 20,000 characters. Pretty straightforward, right? Granted, we could have additional fields to cover other scenarios in our report builder, but for now we’re just covering the concept of creating multiple reports. Next, let’s cover the Apex class.

Our Apex Class
The Apex class called CustomReportController will consist of our DML methods as previously mentioned. However, let’s break down the code piece by piece. We’ll start with our class variables which only consist of one. A private static variable called output of type ReportOutput will store the result information of our report. Next, we have a private inner class called ReportOutput which will act as a wrapper containing the output information of our report. This wrapper class will contain the records returned from the query, column field information, and the report information.
public with sharing class CustomReportController {
    private static ReportOutput output = new ReportOutput();

    private class ReportOutput {
        // The data result of our query
        public List<SObject>        result { get; set; }
        // field information containing the label => api name
        public Map<String, String>  columns { get; set; }
        // Used only when a report is created which will
        // contain the report id and name
        public Map<String, String>  info { get; set; }
    }
Next, we have our DML methods. With these methods, we have the ability to query the list of available reports, query and return the result set of a selected report, create a new report, and update or delete an existing report. Each one is straightforward with comments provided in the code, but I will point out that the methods runReport, createReport, and updateReport each reference a private static method called runQuery. This method is primarily used to validate the query and assign the result of our query to the private static variable, output.
    // Get the list available of reports
    @RemoteAction
    public static List<Custom_Report__c> getReports() {
        return [select Id, Report_Name__c
                from Custom_Report__c
                order by Report_Name__c];
    }

    // Run the selected report from the dropdown list
    @RemoteAction
    public static ReportOutput runReport(Id reportId) {
        String query = [select Query__c from Custom_Report__c where Id = :reportId].Query__c;
        runQuery(query);

        return output;
    }

    // Validate the query by running it before inserting it. If it was a
    // success then insert it and return the result
    @RemoteAction
    public static ReportOutput createReport(String name, String query) {
        runQuery(query);

        Custom_Report__c report = new Custom_Report__c(
            Report_Name__c = name,
            Query__c = query
        );
        insert report;

        output.info = new Map<String, String>();
        output.info.put('id', report.Id);
        output.info.put('name', report.Report_Name__c);

        return output;
    }

    // Validate the query by running it before updating it. If it was a
    // success then update it and return the result
    @RemoteAction
    public static ReportOutput updateReport(Id reportId, String name, String query) {
        runQuery(query);

        Custom_Report__c report = new Custom_Report__c(
            Id = reportId,
            Report_Name__c = name,
            Query__c = query
        );
        update report;

        return output;
    }

    @RemoteAction
    public static void deleteReport(Id reportId) {
        delete [select Id from Custom_Report__c where Id = :reportId];
    }
Finally, we’re left with our last RemoteAction and two private methods. The getReportQuery method is used to retrieve the query value that exists in the record which is then populated on the client side of the Update Report screen. The private method runQuery is used to validate the query as previously mentioned, but will also call the private method parseQueryFields which returns the fields that will be used for our resulting data set. The method then takes those two result sets and saves them into the static variable, output. The last method parseQueryFields will parse the query text and identify the fields that we will be using. It then iterates through the list of fields, gets the label name associated with the API name, and stores the two values into a Map. This method is only referenced in the runQuery method. Now, let’s cover the Visualforce page.
    // Get the saved query from the record. This is used when the update report
    // option is selected
    @RemoteAction
    public static String getReportQuery(Id reportId) {
        return [select Query__c from Custom_Report__c where Id = :reportId].Query__c;
    }

    // Set the query text to lowercase, execute the query, and parse the text to
    // retrieve the fields used in the query
    private static void runQuery(String query) {
        String lcQuery = query.toLowerCase();

        output.result = Database.query(lcQuery);
        output.columns = parseQueryFields(lcQuery);
    }

    private static Map<String, String> parseQueryFields(String query) {
        // Get the select fields
        List<String> fields = query.substring(6, query.indexOf('from')).split(',');

        // Get the describe field information of the SObject from the query so that
        // we can save the api name and label that will be used for the column information
        // of our report table
        Map<String, Schema.SObjectField> fieldMap = output.result.getSObjectType().getDescribe().fields.getMap();
        Map<String, String> columnInfo = new Map<String, String>();
        Schema.DescribeFieldResult fieldResult;
        for (String field : fields) {
            // Trim the field from our fields list so that any leading/trailing spaces
            // and carriage returns are not included when getting the field info
            fieldResult = fieldMap.get(field.trim()).getDescribe();
            columnInfo.put(fieldResult.getName(), fieldResult.getLabel());
        }

        return columnInfo;
    }
}
The Visualforce Page
The Visualforce page is basic in regards to the HTML content. We are using Bootstrap so that we can quickly prototype a nice looking interface. The content consists of a dropdown menu which will contain our list of reports. Next, we have three buttons to the right of that to update, delete, or create a report. Finally, we have our two modals that will popup when selecting any of the three buttons I just mentioned. The reason why there are two modals and not three is because one is for the delete option while the other modal handles both the create and update option. We are also loading third party CSS and JavaScript libraries through the use of CDNs, but this is only for demonstration purposes and is therefore recommended to use static resources .
<apex:page controller="CustomReportController" doctype="html-5.0" showHeader="false" sidebar="false" standardStylesheets="false">
<html>
<head>
<meta charset="utf-8"/>
<meta name="viewport" content="width=device-width, initial-scale=1"/>
<link rel="stylesheet" href="https://maxcdn.bootstrapcdn.com/bootstrap/3.3.6/css/bootstrap.min.css" integrity="sha384-1q8mTJOASx8j1Au+a5WDVnPi2lkFfwwEAa8hDDdjZlpLegxhjVME1fgjWPGmkzs7" crossorigin="anonymous"/>
<link rel="stylesheet" href="https://cdn.datatables.net/t/bs/dt-1.10.11/datatables.min.css"/>
</head>
<body>
<div class="container">
<br/>
<!-- The dropdown list of available reports as well as the available DML options such as update, delete, or create a report -->
<div class="row">
<div class="dropdown" id="report-dropdown">
<button id="available-reports-btn" class="btn btn-default dropdown-toggle" disabled="disabled" type="button" data-toggle="dropdown" aria-haspopup="true" aria-expanded="true">
Reports
<span class="caret"></span>
</button>
<ul class="dropdown-menu" aria-labelledby="available-reports-btn"></ul>
<input id="update-report-btn" class="btn btn-default" disabled="disabled" type="button" value="Update Report" data-toggle="modal" data-target="#report-info-screen"/>
<input id="delete-report-btn" class="btn btn-default" disabled="disabled" type="button" value="Delete Report" data-toggle="modal" data-target="#delete-report-screen"/>
<input id="create-report-btn" class="btn btn-default" type="button" value="Create Report" data-toggle="modal" data-target="#report-info-screen"/>
</div>
</div>
<br/>
<!-- The result output for our DataTable -->
<div class="row">
<table id="report-table" class="table table-striped table-bordered" cellspacing="0" width="100%">
<thead><tr><th>Select or create a report...</th></tr></thead>
</table>
</div>
<!-- Delete Report Modal -->
<div class="modal fade" id="delete-report-screen" tabindex="-1" role="dialog">
<div class="modal-dialog">
<div class="modal-content">
<div class="modal-header">
<button type="button" class="close" data-dismiss="modal" aria-label="Close"><span aria-hidden="true">×</span></button>
<h4 class="modal-title">Delete Report</h4>
</div>
<div class="modal-body"></div>
<div class="modal-footer">
<button type="button" class="btn btn-default" data-dismiss="modal">Cancel</button>
<button type="button" class="btn btn-primary" id="delete-report">Delete</button>
</div>
</div><!-- /.modal-content -->
</div><!-- /.modal-dialog -->
</div><!-- /.modal -->
<!-- Create/Update Report Modal -->
<div class="modal fade" id="report-info-screen" tabindex="-1" role="dialog">
<div class="modal-dialog">
<div class="modal-content">
<div class="modal-header">
<button type="button" class="close" data-dismiss="modal" aria-label="Close"><span aria-hidden="true">×</span></button>
<h4 class="modal-title"></h4>
</div>
<div class="modal-body">
<div class="form-group">
<input type="text" class="form-control" id="report-name" placeholder="Report Name"/>
</div>
<div class="form-group">
<textarea class="form-control" id="soql-query" rows="15" placeholder="SOQL Query..."></textarea>
</div>
</div>
<div class="modal-footer">
<button type="button" class="btn btn-default" data-dismiss="modal">Cancel</button>
<button type="button" class="btn btn-primary" id="report-submission"></button>
</div>
</div><!-- /.modal-content -->
</div><!-- /.modal-dialog -->
</div><!-- /.modal -->
</div>
<script src="https://ajax.googleapis.com/ajax/libs/jquery/1.12.2/jquery.min.js"></script>
<script src="https://maxcdn.bootstrapcdn.com/bootstrap/3.3.6/js/bootstrap.min.js" integrity="sha384-0mSbJDEHialfmuBBQP6A4Qrprq5OVfW37PRR3j5ELqxss1yVqOtnepnHVP9aJ7xS" crossorigin="anonymous"></script>
<script src="https://cdn.datatables.net/t/bs/dt-1.10.11/datatables.min.js"></script>
Here, we can see the what the page will look like shown below. Now, let’s go over the JavaScript code, but before we do please note that embedding JavaScript is only for demonstration purposes and is therefore recommended to use static resources .

Let’s first set up our variables that we’ll need to use. These variables will mostly of consist of setting up the selectors using
jQuery
so that we don’t call the same selector multiple times. We also have variables to keep track of what is happening based on the user’s interaction such as storing the report id and name when one is selected from the dropdown menu. Next, let’s go over the JSRemote class.
        <script>
            j$ = jQuery.noConflict();
            j$(function() {
                var availableReportsBtn = j$('#available-reports-btn'),
                    reportDropdownList  = j$('#report-dropdown ul'),
                    // Keep track of the selected reported whether one was
                    // selected from the dropdown or if a new report was created
                    selectedReport,
                    selectedReportId,

                    // delete variables used for our delete modal screen
                    deleteReportBtn     = j$('#delete-report-btn'),
                    deleteModal         = j$('#delete-report-screen'),
                    deleteModalBody     = deleteModal.find('.modal-body'),
                    deleteModalSubmit   = deleteModal.find('#delete-report'),

                    updateReportBtn     = j$('#update-report-btn'),
                    createReportBtn     = j$('#create-report-btn'),

                    // Used for the generic modal screen that will be used to
                    // dynamically call a method from the JSRemote class
                    reportAction,
                    // Used to save the create report input values temporarily
                    // in case there are errors when creating the report
                    clearCreateScreen   = true,
                    createReportName,
                    createSoqlQuery,

                    // Used for the generic modal screen whether a report is
                    // being created or updated
                    reportModal         = j$('#report-info-screen'),
                    reportModalBody     = reportModal.find('.modal-body'),
                    reportModalTitle    = reportModal.find('.modal-title'),
                    reportModalSubmit   = reportModal.find('#report-submission'),
                    reportName          = reportModal.find('#report-name'),
                    soqlQuery           = reportModal.find('#soql-query'),

                    reportTable         = j$('#report-table'),
                    reportTableDt       = reportTable.DataTable();
The JSRemote class consist of calling the Visualforce RemoteAction methods for the most part. The class makes up a majority of the custom JavaScript code, so let’s break down the code piece by piece.
First, we have our private methods which consist of refreshing the DataTable or displaying error messages. The refresh methods restartTable and redrawTable are used for the select, update, delete, or create action. The error methods displayError and displayErrorInModal are used in the callback of the Visualforce.remoting.Manager.invokeAction method. In addition to these private methods, we also have a public method, removeErrorAlert, that clears any error messages when any of the DML options: update, delete, or create are selected.
var JSRemote = function () {
var self = this;
// Used when a report is deleted
var restartTable = function() {
// Destroy the DataTable and begin with the blank table
// that we see initially
reportTableDt.destroy();
reportTable.empty();
reportTable.append('<thead><tr><th>Select or create a report...</th></tr></thead>');
reportTableDt = reportTable.DataTable();
};
// Used for selecting, updating, or creating a report
var redrawTable = function(result) {
// Destroy the DataTable and clear out the columns in case
// we have a dataset with different columns
reportTableDt.destroy();
reportTable.empty();
// rowData should already be an array of objects, each object representing a record,
// with the key equating to the the api name field and the value will be the value
// of that field for the record
// columnData will also be an array of objects. This only contains the fields that
// were referenced in our soql query. The key will represent the api name
// of the field and the value will represent the field label for that api name.
var rowData = result['result'],
columnData = result['columns'],
dataCol = [];
// Extract the column information and set it to the specifications of the
// DataTables columns option key used to setup the table
for (var key in columnData) {
dataCol.push({
// Api field name
"data": key,
// Field label
"title": columnData[key],
// Set the defaultContent value for key cell values that do not exist
// (i.e. if the column is null from the query then it will not be
// included in the object result from our RemoteAction apex call)
// Otherwise the following error will appear:
// DataTables warning: table id={id} - Requested unknown parameter
// '{parameter}' for row {row-index}, column{column-index}`
// Please see the following link for more details:
// https://datatables.net/manual/tech-notes/4
"defaultContent": "" });
}
// Initialize the DataTable
reportTableDt = reportTable.DataTable({
columns: dataCol,
data: rowData,
deferRender: true
});
};
// Extract the error information from our RemoteAction response
var getErrorMsg = function(event) {
var errorMsg = event.message;
if (event.type === 'exception') {
if (event.where) {
errorMsg += "<pre>" + event.where + "</pre>";
}
}
return errorMsg;
}
var displayError = function(event) {
var errorMsg = getErrorMsg(event)
j$('.alert-danger').remove();
j$('.container').prepend(
'<div class="alert alert-danger alert-dismissible" role="alert">' +
'<button type="button" class="close" data-dismiss="alert" aria-label="Close">' +
'<span aria-hidden="true">×</span></button>' +
errorMsg +
'</div>');
};
var displayErrorInModal = function(event, isCreate = false) {
var errorMsg = getErrorMsg(event)
j$('.alert-danger').remove();
reportModalBody.prepend(
'<div class="alert alert-danger alert-dismissible" role="alert">' +
'<button type="button" class="close" data-dismiss="alert" aria-label="Close">' +
'<span aria-hidden="true">×</span></button>' +
errorMsg +
'</div>');
// Temporarily store the report name and query so that
// the user does not have to type it in again in case
// they exit from the modal and choose the create report
// option again
if (isCreate) {
clearCreateScreen = false;
createReportName = reportName.val();
createSoqlQuery = soqlQuery.val();
}
};
// Remove any alerts in case we receive new ones
this.removeErrorAlert = function() {
j$('.alert-danger').remove();
};
Next, we have a set of public methods that will query the report data. The getReports method will return an array of available report objects from the Custom_Report__c object. If no records exist, then the result is returned as an empty array. The runReport method will return the associated records based on the value of the query field from the selected report.
                    // Get our list of reports
                    this.getReports = function() {
                        Visualforce.remoting.Manager.invokeAction(
                            '{!$RemoteAction.CustomReportController.getReports}',
                            function(result, event) {
                                if (event.status) {
                                    if (result.length) {
                                        availableReportsBtn.removeAttr('disabled');
                                        reportDropdownList.empty();
                                        for (let report of result) {
                                            reportDropdownList.append('<li><a href=' + report['Id'] + '>' +
                                                                    report['Report_Name__c'] + '</a></li>');
                                        }
                                    } else {
                                        availableReportsBtn.attr('disabled', 'disabled');
                                    }
                                } else {
                                    displayError(event);
                                }
                            }
                        );
                    };

                    // Query the selected report and display the result
                    this.runReport = function() {
                        Visualforce.remoting.Manager.invokeAction(
                            '{!$RemoteAction.CustomReportController.runReport}',
                            selectedReportId,
                            function(result, event) {
                                if (event.status) {
                                    redrawTable(result);
                                } else {
                                    displayError(event);
                                }
                            }
                        );
                    };
Finally, we have our remaining DML public methods that will update, delete, or create a report.
                    // Delete the selected report, update the Reports dropdown,
                    // display a blank table, and disable the update and delete
                    // report options
                    this.deleteReport = function() {
                        Visualforce.remoting.Manager.invokeAction(
                            '{!$RemoteAction.CustomReportController.deleteReport}',
                            selectedReportId,
                            function(result, event) {
                                if (event.status) {
                                    deleteModal.modal('hide');
                                    updateReportBtn.attr('disabled', 'disabled');
                                    deleteReportBtn.attr('disabled', 'disabled');
                                    self.getReports();
                                    restartTable();
                                } else {
                                    displayErrorInModal(event);
                                }
                            }
                        );
                    };

                    // Return the saved query from the database when selecting
                    // the update report option so that we can display it on the modal
                    this.getReportData = function() {
                        Visualforce.remoting.Manager.invokeAction(
                            '{!$RemoteAction.CustomReportController.getReportQuery}',
                            selectedReportId,
                            function(result, event) {
                                if (event.status) {
                                    reportName.val(selectedReport);
                                    // replace the ascii quote with an actual quote character
                                    soqlQuery.val(result.replace(/'/g, "'"));
                                } else {
                                    displayErrorInModal(event);
                                }
                            }
                        );
                    }

                    // Update the report, update the Reports dropdown, and redraw the table
                    this.updateReport = function() {
                        Visualforce.remoting.Manager.invokeAction(
                            '{!$RemoteAction.CustomReportController.updateReport}',
                            selectedReportId,
                            reportName.val(),
                            soqlQuery.val(),
                            function(result, event) {
                                if (event.status) {
                                    reportModal.modal('hide');
                                    self.getReports();
                                    redrawTable(result);
                                } else {
                                    displayErrorInModal(event);
                                }
                            }
                        );
                    };

                    // Create the report, update the Reports dropdown, refresh the table,
                    // and open up the options to update or delete the created report
                    // if the user would like to do so
                    this.createReport = function() {
                        Visualforce.remoting.Manager.invokeAction(
                            '{!$RemoteAction.CustomReportController.createReport}',
                            reportName.val(),
                            soqlQuery.val(),
                            function(result, event) {
                                if (event.status) {
                                    reportModal.modal('hide');
                                    self.getReports();

                                    clearCreateScreen = true;
                                    createReportName = null;
                                    createSoqlQuery = null;

                                    var reportInfo = result['info'];
                                    updateReportBtn.removeAttr('disabled');
                                    deleteReportBtn.removeAttr('disabled');
                                    selectedReportId = reportInfo['id'];
                                    selectedReport = reportInfo['name'];

                                    redrawTable(result);
                                } else {
                                    displayErrorInModal(event, true);
                                }
                            }
                        );
                    };
                };
The remaining JavaScript code after the JSRemote class consist of our jQuery events for the various click events whether we choose to select, update, delete, or create a report. The events will either update the modal screen text, call a method from the JSRemote class, or enable the remaining report buttons when a report is selected.
                var jsRemote = new JSRemote();
                // Retrieve any available reports and display it on the dropdown
                jsRemote.getReports();

                // Will dynamically display the are you sure text with the name of the report
                deleteReportBtn.click(function(){
                    jsRemote.removeErrorAlert();
                    deleteModalBody.text('Are you sure you want to delete the folowing report: ' + selectedReport);
                });

                // Proceed with deleting the report
                deleteModalSubmit.click(function(){
                    jsRemote.deleteReport();
                });

                // Will dynamically set the modal title and submit text for the generic modal
                // and get the saved query from the database
                updateReportBtn.click(function() {
                    jsRemote.removeErrorAlert();
                    reportModalTitle.text('Update Report');
                    reportModalSubmit.text('Update');
                    jsRemote.getReportData();
                    reportAction = 'updateReport';
                });

                // Will dynamically set the modal title and submit text for the generic modal
                // and display any previously entered information if the create report submission
                // had previously received an error, but was not corrected
                createReportBtn.click(function() {
                    jsRemote.removeErrorAlert();
                    reportModalTitle.text('Create a Report');
                    reportModalSubmit.text('Create');
                    if (clearCreateScreen) {
                        reportName.val('');
                        soqlQuery.val('');
                    } else {
                        reportName.val(createReportName);
                        soqlQuery.val(createSoqlQuery);
                    }
                    reportAction = 'createReport';
                });

                // Dynamically execute the method based on the reportAction whether
                // it is a create or delete operation
                reportModalSubmit.click(function() {
                    jsRemote[reportAction]();
                });

                // Handle elements added after the fact for the Reports dropdown
                reportDropdownList.on("click", "li", function(event) {
                    event.preventDefault();
                    // open up the options to update or delete the report
                    updateReportBtn.removeAttr('disabled');
                    deleteReportBtn.removeAttr('disabled');
                    // Get the selected report name and Id information
                    selectedReport = j$(this).text();
                    selectedReportId = j$(this).find('a').attr('href');
                    jsRemote.runReport();
                });
            });
        </script>
    </body>
</html>
</apex:page>
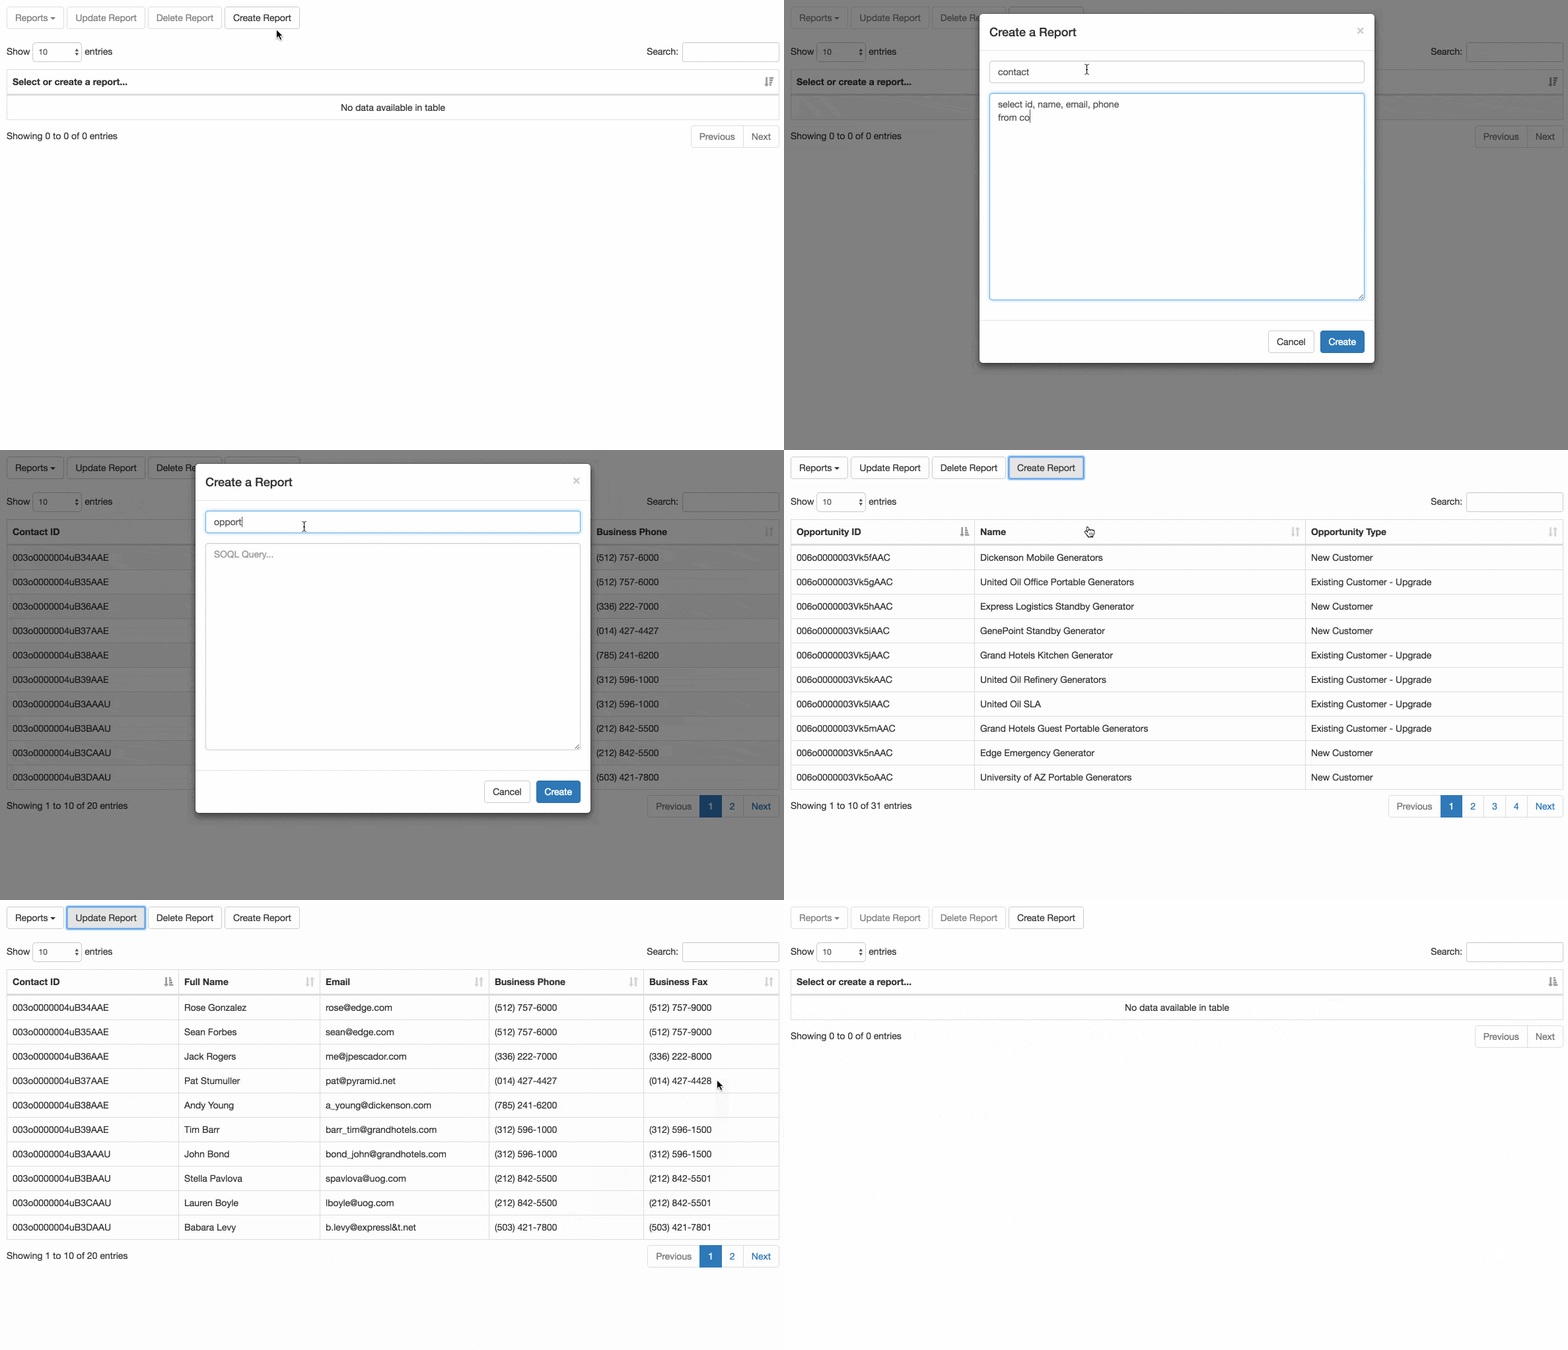
We can now see our custom report builder in action once the custom object and associated files have been setup in our Salesforce environment.

Conclusion
Now that we have this implemented, what advantage does this approach provide? We have the ability to create custom reports using SOQL and the output uses the DataTables interface, which provides more flexibility when viewing the data such as multi sorting and instant search. Any updates to a report or creating a new one is executed through Ajax so that view state is updated without the need of refreshing the page. And we also have the ability to view more than 2,000 records. Granted, there are some features missing that standard Salesforce reports have out of the box such as creating report folders, setting permissions on a report folder, and setting scheduled reports for Salesforce users. However, I like to think of this solution as the foundation to add even more features such as the ones I just mentioned. I would also like to stress that this is a basic proof of concept showing the possibility of what can be done in Saleforce. Therefore, if for example we want to return more than 50,000 records then I would suggest looking into implementing pagination in the Apex controller . If we also want to utilize outer joins in our SOQL query, then that feature will need to implemented as well. We may also want to limit the access of who can create a report to just admins and developers which can be implemented by placing a logic check in our Apex code.
If you’re still interested in wanting to try out this custom report builder, then you can get the code on GitHub . Thanks for reading!

Twitter
Google+
Facebook
Reddit
LinkedIn
StumbleUpon
Email