Use the sforce Metadata API to get managed object permissions
Learn how to retrieve metadata permissions from a managed object and deploy it on Salesforce
Have you ever wondered how you can migrate permissions of a managed object to a targeted environment on Salesforce? It’s not Change Sets , but do not fear. That doesn’t mean you have to configure the permissions again manually. What we’ll be leveraging is a combination of MavensMate and the Force.com Migration tool.
I mentioned permissions, but what do I mean by that? What I am referring to are the crud permissions and field level security from the managed object that is tied to a permission set or profile. In this lesson we will migrate the Standard Salesforce profile with the permissions for the managed object called MyCustomPackage__Application__c. Let’s get started.
Let’s retrieve the metadata of our permissions by first getting the skeleton structure of our package.xml file. We will be using
MavensMate
and
Atom
to do this, but you can also use
Sublime Text 3
with MavensMate. You can also use the
Force.com IDE plugin
if you prefer
Eclipse
.
Creating the Project
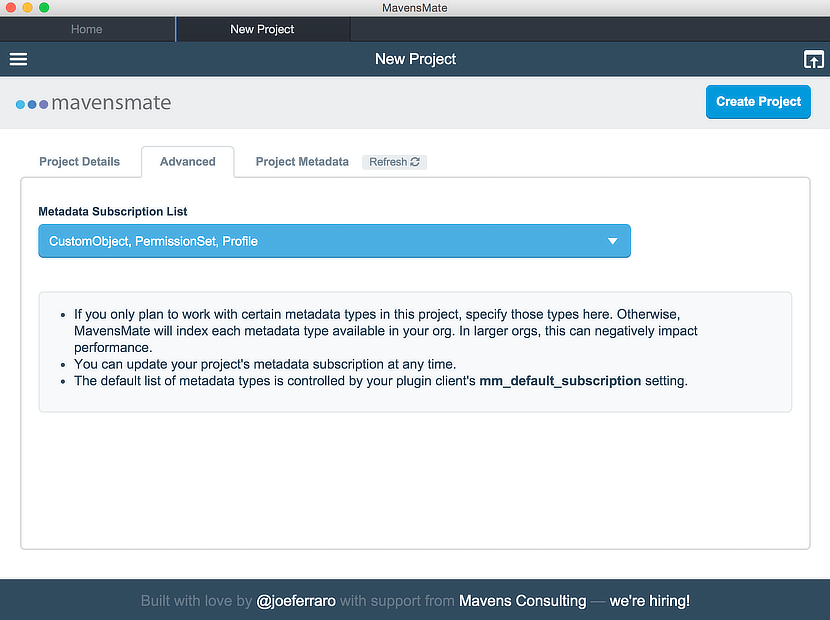
First, let’s create a new project by opening the command palette, typing in new project and selecting Mavensmate: New Project. You can also create a new project by selecting MavensMate > Project > New Project… from the toolbar. Let’s call the project get_skeleton and enter in our credentials. Select the Advanced tab after your account has authenticated. You will see a dropdown called Metadata Subscription List.
Select CustomObject, Profile, and PermissionSet from the dropdown and press the Create Project button.
Our project has been created and we can see the project structure that has been created which consist of:
config/
src/
get_skeleton.sublime-project
Edit the Project
Open the command palette, type in edit project, and select Mavensmate: Edit Project. You can also proceed to it by selecting MavensMate > Project > Edit Project… from the toolbar. You’ll see the three metadata types appear on the Project Metadata tab: CustomObject, Profile, and PermissionSet.
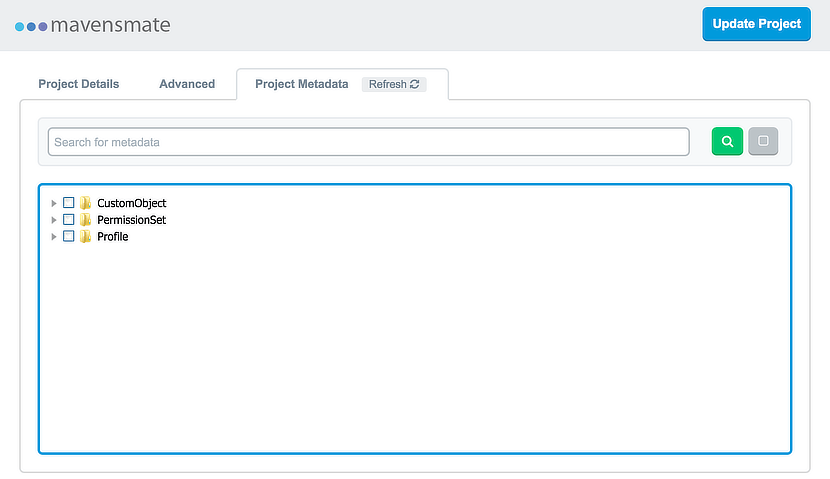
I’ll expand the CustomObject folder and I can see that the managed object, MyCustomPackage__Application__c, is not showing up. No worries though, we’ll traverse to the Contact folder and select it. The reason why we are selecting this is because it will be a placeholder in our generic package.xml file which will be replaced later. Next, expand the Profile or PermissionSet folder that will require the permission. I will select the Standard profile. Press the Update Project button and return to Atom.
Review the retrieved data
Expand the src directory and we can see the metadata for the Contact object and Standard profile was retrieved. If we select the Standard.profile, we can see the CRUD permissions on the Contact object for this profile labeled as objectPermissions:
<objectPermissions>
    <allowCreate>true</allowCreate>
    <allowDelete>true</allowDelete>
    <allowEdit>true</allowEdit>
    <allowRead>true</allowRead>
    <modifyAllRecords>false</modifyAllRecords>
    <object>Contact</object>
    <viewAllRecords>false</viewAllRecords>
</objectPermissions>
We can also see the field level security on each field labeled as fieldPermissions.
<fieldPermissions>
    <editable>true</editable>
    <field>Contact.AccountId</field>
    <readable>true</readable>
</fieldPermissions>
Please note that if the Contact object was not selected in our previous step, then the permissions for the object would not appear in the Standard.profile.
Modifying the package.xml file
Open the package.xml file and we can see the skeleton structure that we will be using:
<?xml version="1.0" encoding="UTF-8"?>
<Package xmlns="http://soap.sforce.com/2006/04/metadata">
    <types>
        <members>Contact</members>
        <name>CustomObject</name>
    </types>
    <types>
        <members>Standard</members>
        <name>Profile</name>
    </types>
    <version>35.0</version>
</Package>
Let’s replace the value of Contact in the types members element to the custom object api name we actually want. I will replace this with MyCustomPackage__Application__c. Save your changes and let’s open our command line interface so we can use the Force.com migration tool. If you don’t have the tool installed, please refer to this link on Salesforce:
Installing the Force.com migration tool
Utilizing the Force.com migration tool
Before we proceed any further, you may have realized that you could’ve technically skipped the MavensMate section and started at this section. However, I only recommend this if you are comfortable with creating the package.xml file from scratch. I leverage MavensMate and Atom because of the convenience it provides. I can potentially get any skeletal structure of the package.xml and modify it to my needs without having to refer to the Project Manifest and Metadata Types Docs . However, I do suggest checking out the Metadata Types Doc when you are start exploring what this tool can do. Let us continue with the lesson.
If you have your own build.xml file and directory structure for the Force.com migration tool, terrific! If not, don’t fret. Our structure will be straightforward and will actually mimic our project structure on MavensMate.
sforce-ant-sample
    config/
    src/
    build.xml
Let’s break down the structure. The config directory will consist of our build property files. Each file will represent the environment that we are working with. The src directory will consist of our package.xml as well as the contents that will be retrieved when using the Force.com migration tool. Let’s place this structure in our home directory.
Now, on to the build.xml file. This is a simple and straightforward configuration that can retrieve or deploy the metadata. Here is the file that we will be using:
<project name="Sample usage of Salesforce Ant tasks" default="retrieve"
    basedir="." xmlns:sf="antlib:com.salesforce">
    <!-- Set default salesforce environment if sf.env was not set -->
    <!-- Replace this with your own default environment -->
    <condition property="sf.env" value="nameOfEnvironment">
        <not> <isset property="sf.env"/> </not> </condition>

    <property file="config/build_${sf.env}.properties"/>
    <property environment="env"/>

    <!-- Setting default value for username, password and session id properties
         to empty string so unset values are treated as empty. Without this,
         ant expressions such as ${sf.username} will be treated literally.
    -->
    <condition property="sf.username" value=""> <not>
        <isset property="sf.username"/> </not> </condition>
    <condition property="sf.password" value=""> <not>
        <isset property="sf.password"/> </not> </condition>
    <condition property="sf.sessionId" value=""> <not>
        <isset property="sf.sessionId"/> </not> </condition>

    <taskdef resource="com/salesforce/antlib.xml" uri="antlib:com.salesforce">
        <classpath>
            <!-- Replace this with the actual path to the jar -->
            <pathelement location="/path/to/jar/ant-salesforce.jar" />
        </classpath>
    </taskdef>

    <target name ="retrieve">
        <echo message="Retrieving metadata from ${sf.env}"/>
        <sf:retrieve
            username="${sf.username}"
            password="${sf.password}"
            sessionId="${sf.sessionId}"
            serverurl="${sf.serverurl}"
            maxPoll="${sf.maxPoll}"
            retrieveTarget="src"
            unpackaged="src/package.xml"/>
    </target>

    <target name ="deploy">
        <echo message="Deploying metadata to ${sf.env}"/>
        <sf:deploy
            username="${sf.username}"
            password="${sf.password}"
            sessionId="${sf.sessionId}"
            serverurl="${sf.serverurl}"
            maxPoll="${sf.maxPoll}"
            deployRoot="src"
            rollbackOnError="true"/>
    </target>

</project>
Make sure to replace /path/to/jar/ant-salesforce.jar with the actual path of your jar file before proceeding. Let’s go ahead and copy the package.xml file that we modified into this directory structure. Go ahead and place that into the src sub directory.
Proceed to the config directory after copying the package file. Here we will set up property information such as our credentials and server url that we’ll be using. We will create two config files. One for retrieval and one for deployment. The format of the file will be called build_nameOfEnvironment.properties where nameOfEnvironment will be replaced with the actual name of the environment. For example if our environment or sandbox was called juliotest then the file will be called build_juliotest.properties. Here’s an example of what your config would look like:
# build.properties
#

# Specify the login credentials for the desired Salesforce organization
#sf.username = <Insert your Salesforce username here>
#sf.password = <Insert your Salesforce password here>
sf.sessionId = <Insert the sessionId or accessToken here>

# Use 'https://login.salesforce.com' for production or developer edition
# Use 'https://test.salesforce.com for sandbox.
#sf.serverurl = https://test.salesforce.com

# Used for sessionId because serverurl attribute should be a specific app
# server instance. For example if your instance is cs1 then you would enter
# the following below
sf.serverurl = https://cs1.salesforce.com

sf.maxPoll = 20
# If your network requires an HTTP proxy,
# see http://ant.apache.org/manual/proxy.html for configuration.
#
Please note that you can either enter in your username and password or the sessionId. Also keep in mind that you can also use the accessToken in place of the sessionId. Whatever is your preference
Retrieving the managed object permissions
Now let’s run the following command in our directory:
ant -Dsf.env=juliotest retrieve
Please note that we can just call ant retrieve if our default sf.env variable is juliotest in our build.xml file. We can do even better. We can just call ant which will use the default call and environment based on the configuration of our build file.
We should now see the profile and object contents populate in the src directory. However, we only want to migrate the permissions in the profile and not the metadata of the object. Therefore, we’ll need to remove the objects subdirectory and remove the CustomObjects section in the package.xml file. We can then proceed to deploying the metadata to our targeted environment after making those changes.
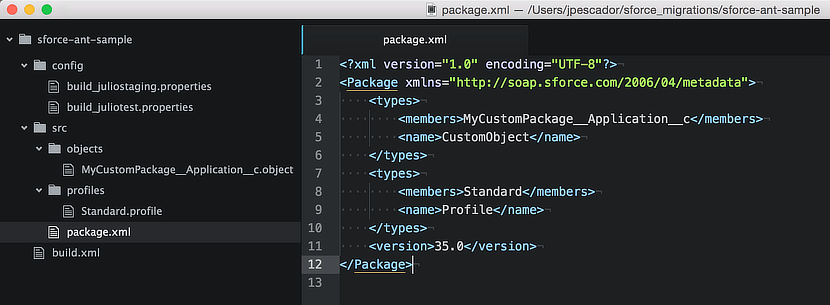
This is what we’re expecting in our src directory after running the retrieve command:
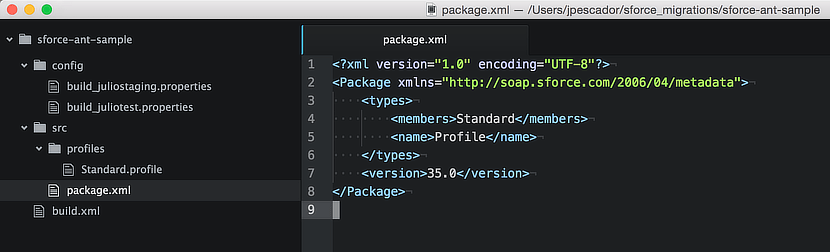
This is what it should look like after removing the objects directory and modifying the package.xml:
I will now run the following command to deploy the metadata to my staging environment:
ant –Dsf.env=juliostaging deploy
Congratulations, we’ve successfully migrated the permissions to a different environment! We avoided the pain and heartache of having to setup the permissions manually in our targeted environment. You can apply this same concept if you are working with multiple objects on a profile or permission set. The same snippets of code for the force.com directory structure is available on GitHub .

Share this post
Twitter
Google+
Facebook
Reddit
LinkedIn
StumbleUpon
Email